Why you don't want to what I do

How I got here

So I see a lot of confusion from people that seem to think that they should also get a system like mine, or otherwise replicate my software setup on their machines. I figured I should probably explain more of why I have this setup, and probably why you don't want what I have as not understanding how things work are likely to lead you into many pain points that have lead me directly here. I should probably start with the list of things that I don't need, but people seem to think is a massive gain.

CPU

I do not need 32 cores for my system. I rarely use more than 2% of this CPU even while running several VM's and sometimes do compiles on it. Even doing 10 transcodes on the CPU at once still doesn't fully use it, and if transcodes are something you need, I'd likely recommend a GPU to encode it. This includes integrated GPU's on consumer CPU's.

RAM

RAM is something that will depend massively on your workload. I personally use ZFS, and many TB of storage on mechanical drives. Feeding RAM to that can help performance substantially, and this is where most of my RAM needs to be. I run a pretty large, by most people in the affordable homelab space, software stack, and other than ZFS ARC, most of my actual services will max out about 8GB of RAM needed, 16GB if I want to push it to "just testing" levels. You probably don't need 128GB of RAM.

PCIE

This was one of the biggest reasons that I went with the Epyc platform. This platform supports bifurcation allowing me to put more SSD's into PCIE slots, along with having many lanes to even enable me to run more devices. Many consumer platforms may appear to have 2/3 PCIE 16x, and 2/3 PCIE 1x, but don't actually have enough lanes to drive that. If you try to use 2 16x devices, they will usually drop to 8x, and some boards are only 8x on the second slot always. If you don't plan on much expansion, this is likely not something you care about. I needed the ability to run a few SAS cards for storage, and currently run PCIE networking at 10 gig speeds, and want the ability to do 40/100 gig at some point in the future. Between having proper passthrough support, as well as a massive amount of lanes to actually get devices running at full speed, I can do what I wouldn't ever attempt on most consumer platforms

VM's

VM's are generally something useful in the homelab, but putting your NAS/SAN into a VM has serious implications that you should understand before trying that. Most consumer platforms have pretty bad support for things like PCIE passthrough, be it just having general bugs, or not separating IOMMU groups, leading you to being unable to pass through in general. If you choose to run ZFS, you should give it direct access to the drive controller to help it detect and correct errors. If you have a few TB of throw away data, do as you please, but if you plan to have significant data stored, and/or you care about that data at all, I can't recommend using USB devices, or otherwise giving ZFS indirect access to the storage as you will eventually find issues, and it may be too late. If rebuilding all of your storage is not an issue, do as you see fit, but don't say you weren't warned.

What you probably should do

If you aren't planning on getting a board that has all of the server features, compressing everything into one machine is likely going to cause you more pain than it will help. I'd also not recommend running storage in a VM unless you understand the implications, and plan for it. These days, I highly recommend TrueNAS Scale if you don't personally want to manage the system all at a command line, and even if you do, some of the reporting and automation features are just nice to have, even as someone that managed my storage on headless Alpine for many years. It can also host some basic VM's and "Apps" to replace most people's docker needs. If you don't know exactly why you don't want it at a technical level, it's probably a good option for you.

Further questions?

If that wasn't a complete enough explication of why my system is likely overkill, and why I don't recommend what works for me, feel free to reach out to me on discord as kdb424, or via email at blog@kdb424.xyz as I love questions and am happy to help!

An Epyc Change

I got tired of managing systems

After messing with GlusterFS for a while, learning it's ups and downs, I've determined that I'm moving back to a single physical node, for the most part. I had a few goals in mind when looking at hardware.

  • Enough CPU/RAM to replace everything I currently run
  • PCIE expansion. Lots of lanes for everything I ram in there.
  • IPMI! I don't want to have to go plugging in display/keyboard constantly.

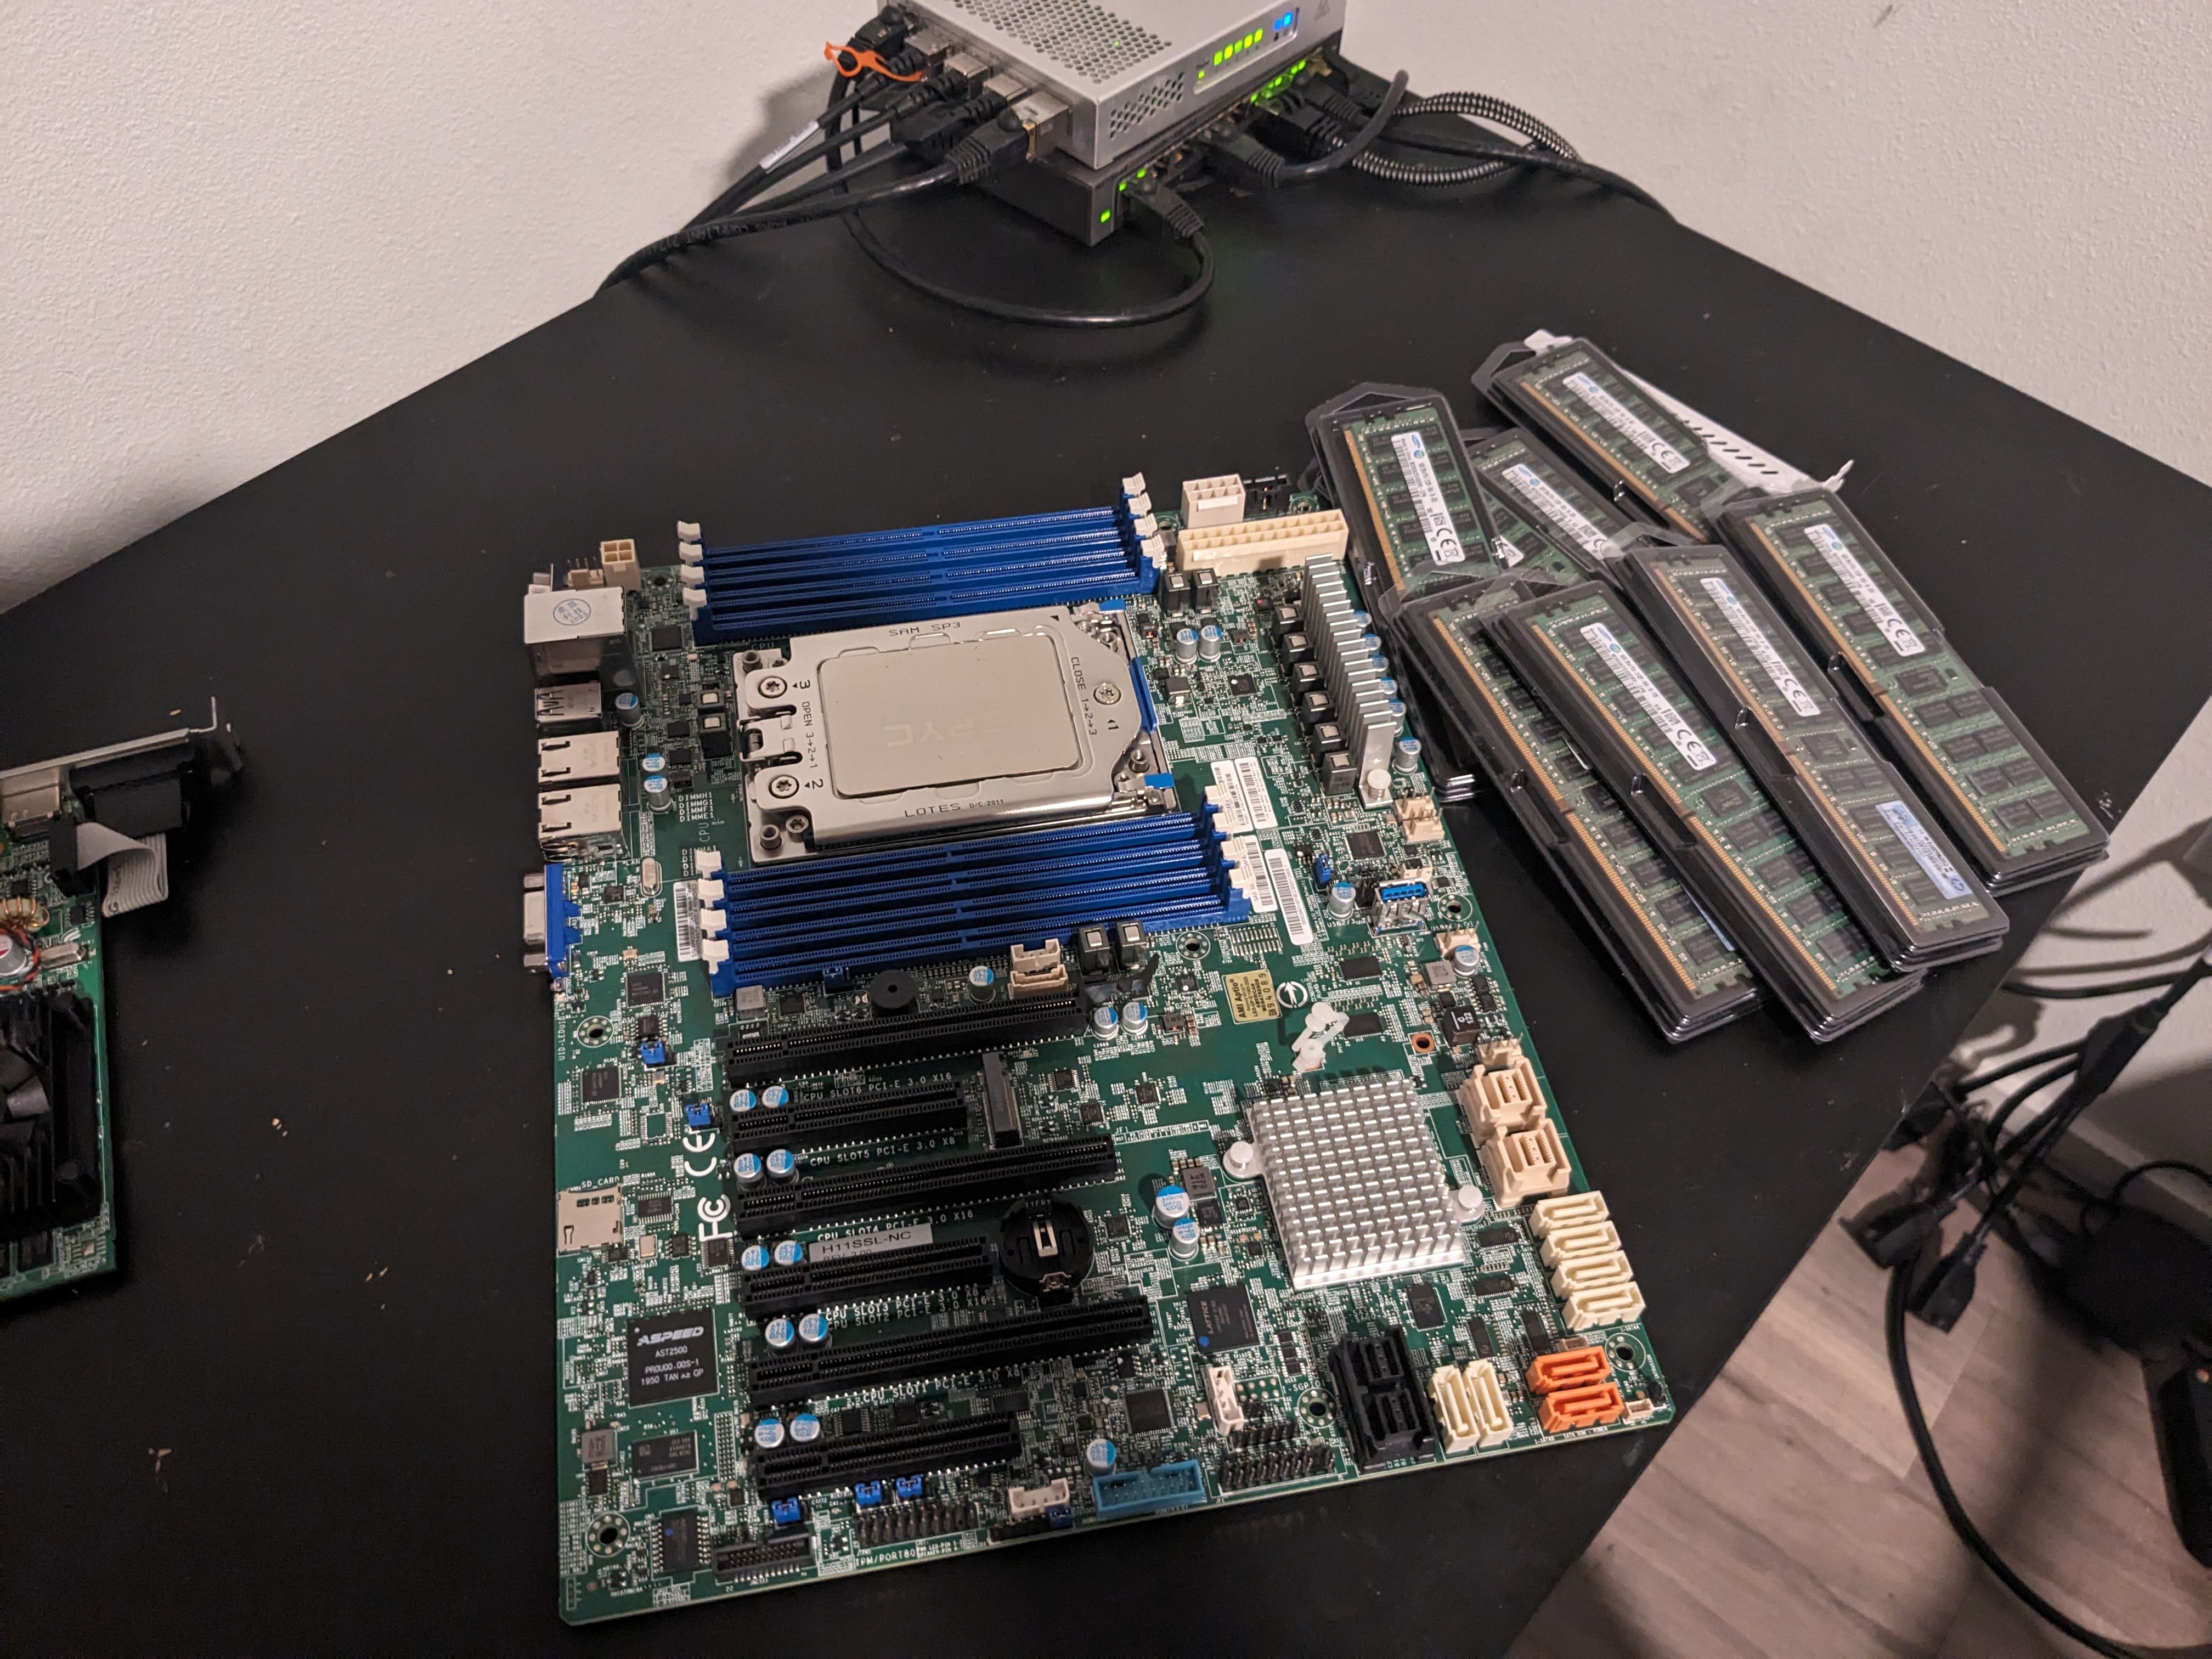
This pretty much left me with 2 major system types to look at. Multi socket Intel Xeon's, or AMD Epyc systems. With old Xeon systems being even more work due to the absolute requirement of understanding UMA and NUMA and more importantly going through the steps of setting it up, higher power draw, and with that noise, I quickly ruled them out. I set my eyes on the Epyc 7551p and the Supermicro H11SSL-NC motherboard to cover every single thing I wanted out of the system. At the cost of about $700 USD to fully replace the core of my old system, I felt like this was a reasonable price for what all I get.

Specs

mainboard.jpg

Build issues and complications

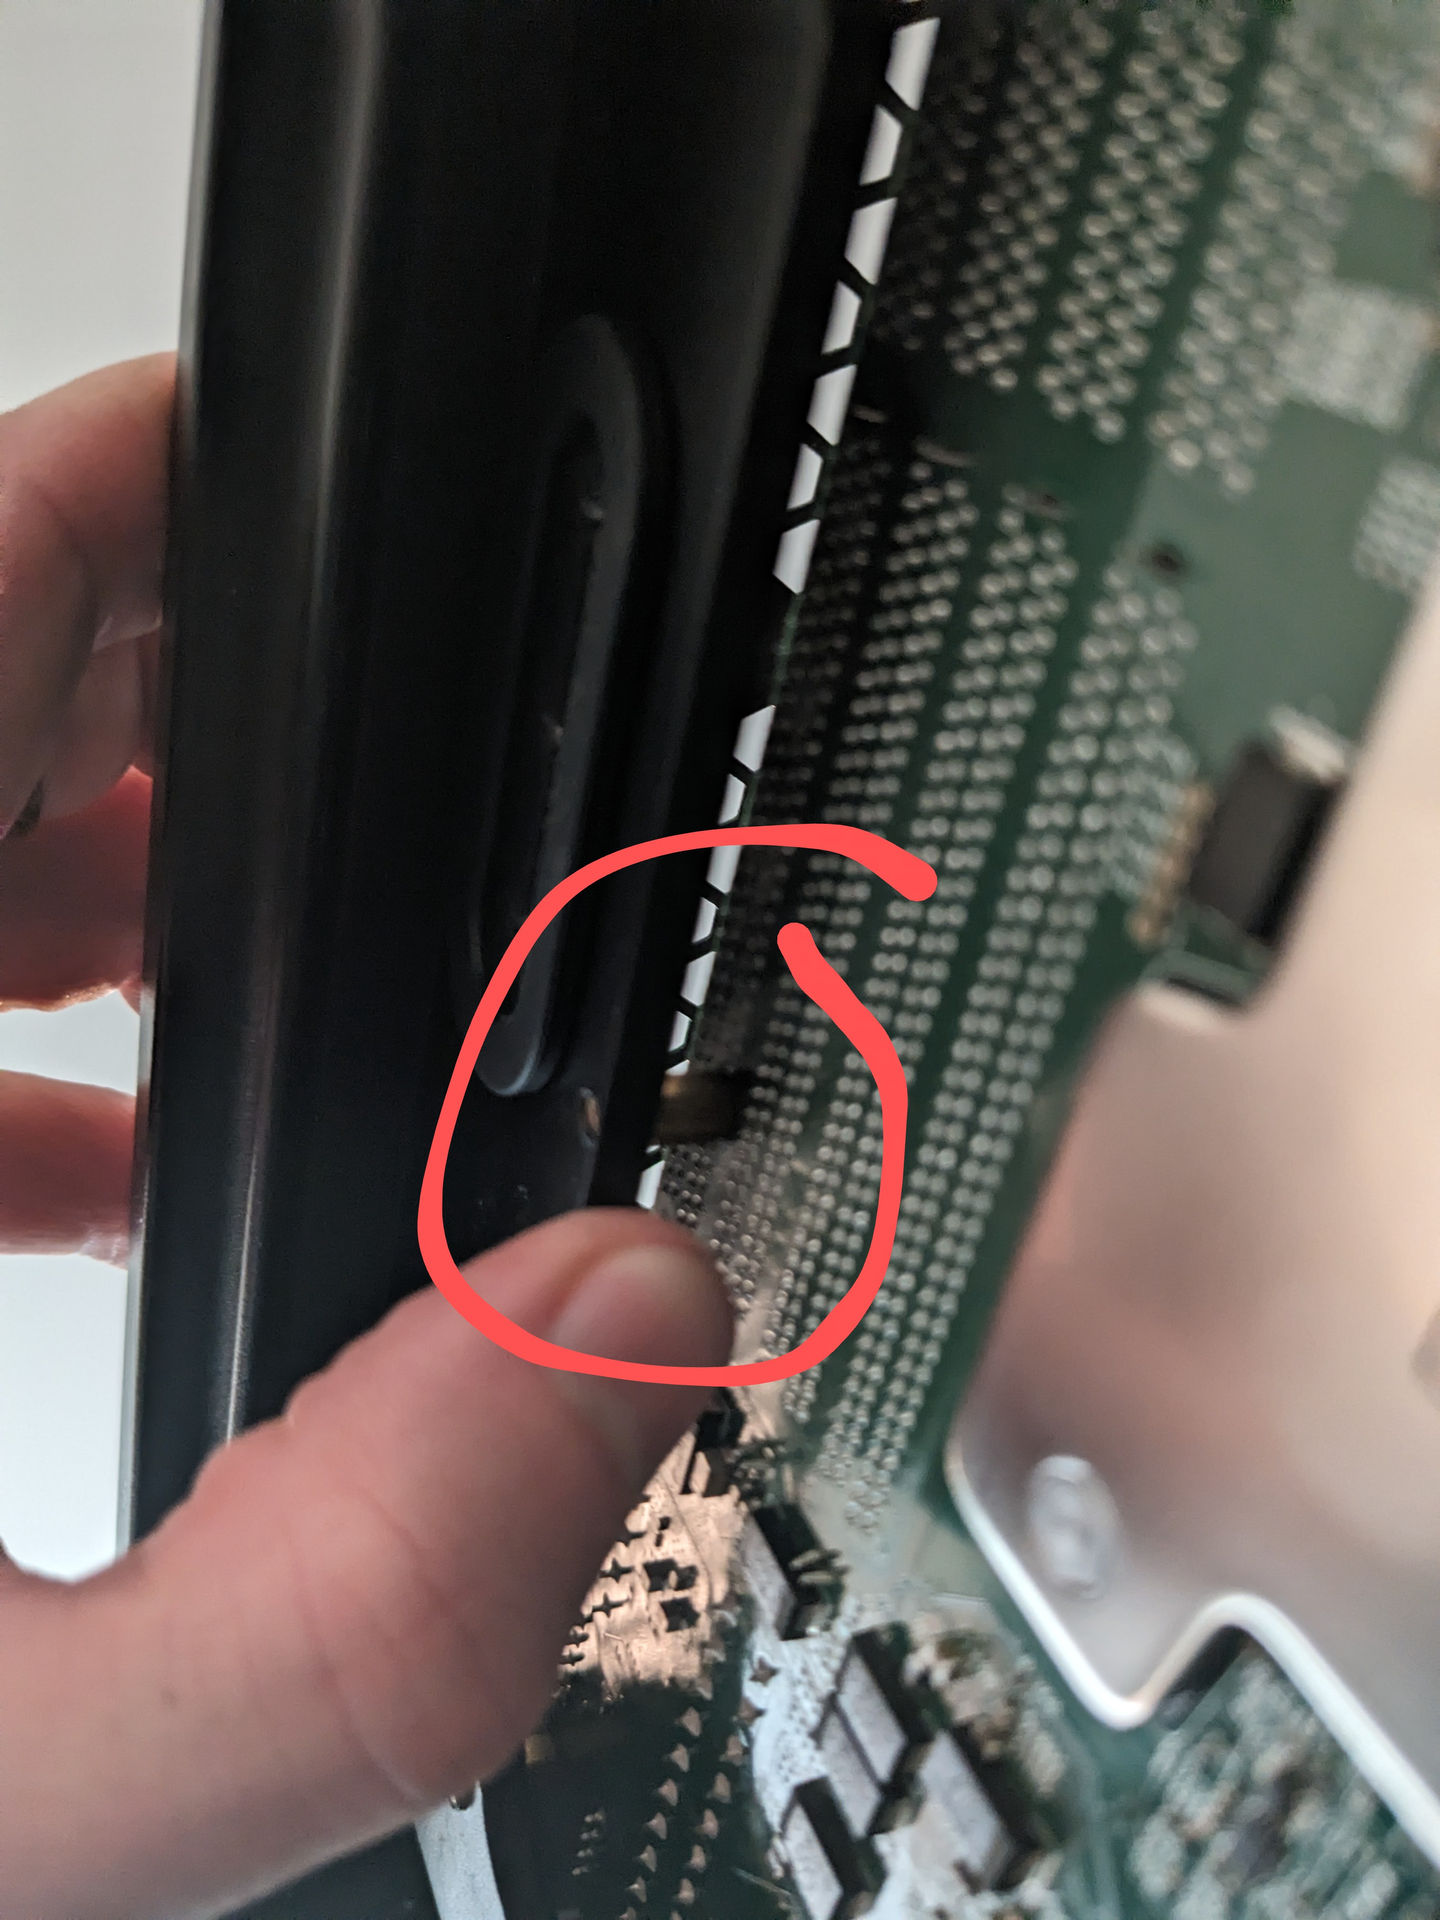
Over all, this was a fairly simple build in terms of hardware. The Motherboard is mostly ATX standard with one exception (photo later). One oversight I had was not having VGA anything to hook up to the system when it showed up. The onboard video is forced to be the only enabled display by default, and I should have seen that coming. IPMI is also disabled by default, so wasn't able to even remote into it until I got a display out.

Turns out it's mostly ATX. Whoops, need to remove a standoff. standoff.jpg

The plan!

The current goal is to get it running on Proxmox to allow for easy separation of duties, and isolation of public/private hosted services. I'm planning on running something to manage ZFS and act as a SAN for the network, probably TrueNAS Scale as I have recommended that many times, and want to see what it's like today, despite knowing well how to manage a fully headless system. I'm pulling out a second gen Ryzen 8 core system of the network, so I'll also be creating a virtual machine to directly replicate it's place to make transitioning easy. After that, it's up to whatever I want. I'll be hosting a semi public Nix Hydra instance for friends since I have too much CPU grunt going to waste. I'll also be able to turn back on transcoding on my Jellyfin server as I know this should easily be able to transcode 4 or more streams while leaving plenty left for the rest of the services. After that, who knows.

What it looks like thus far.

setup.jpg

Glusterfs

What's a Glusterfs?

Glusterfs is a network filesystem with many features, but the important ones here are it's ability to live on top of another filesystem, and offer high availability. If you have used SSHFS, it's quite similar in concept, giving you a "fake" filesystem from a remote machine, and as a user, you can use it just like normal without caring about the details of where the files are actually stored, except "over there I guess". Glusterfs unlike SSHFS, can be stored across multiple machines similar to network RAID. If one machine goes down, the data is still all there and well.

Why even bother?

A few years ago I decided that I was tired of managing docker services per machine and wanted them in a swarm. No more thinking! If a machine goes down, the service is either still up (already replicated across servers like this blog), or will come up on another server once it sees the service isn't alive. This is well and good until you need the SAN to go down. Now all of the data is missing, and the servers don't know, and you basically have to kick the entire cluster over to get it back alive. Not exactly ideal to say the least.

Side rant. Feel free to skip if you only care about the tech bits.

While ZFS has kept my data very secure over the ages, it can't always prevent machine oddity. I have had strange issues such as Ryzen bugs that could lock up machines at idle, a still not figured out random hang on networking (despite changing 80% of the machine, including all disks, operating system, and network cards) before it comes back 10 seconds later, and so on. As much as I always want to have a reliable machine, updates will require service restarts, reboots need done, and honestly, I'm tired of having to babysit computers. Docker swarm and NixOS are in my life because I don't want to babysit, but solve problems once, and be done with it. Storage stability was the next nail to hit, despite it being arguably a small problem, it still reminded me that computers exist when I wasn't in the mood for them to exist.

Why Glusterfs as opposed to Ceph or anything else?

Glusterfs sits on top of a filesystem. This is the feature that took me to it over anything else. I have trusted my data to ZFS for many years, and have done countless things that should have cost me data, including "oops, I deleted 2TB of data on the wrong machine", and having to force power off machines (usually SystemD reasons), and all of my data is safe. The very few things it couldn't save me from, it will happily tell me where there's corruption and I can replace the limited data from a backup. With all of that said, Glusterfs happily lives on top of ZFS, even letting me use datasets just as I have been for ages. It does however let me expand over several machines by using Glusterfs. There's a ton of modes to Glusterfs much as any "RAID software", but I'm sticking to effectively a mirror (RAID 1) in essence. Let's look at the hardware setup to explain this a bit better.

The hardware

planex

  • Ryzen 5700
  • 32GB RAM
  • 2x16TB Seagate Exos
  • 2x1TB Crucial MX500
pool
-------------------------- 
exos
 mirror-0
   wwn-0x5000c500db2f91e8
   wwn-0x5000c500db2f6413
special
 mirror-1
   wwn-0x500a0751e5b141ca
   wwn-0x500a0751e5aff797
-------------------------- 

morbo

  • Ryzen 2700
  • 32GB RAM
  • 5x3TB Western Digital Red
  • 1x10TB Western Digital (replaced a red when it died)
  • 2x500GB Crucial MX500
 red
  raidz2-0
    ata-WDC_WD30EFRX-68EUZN0_WD-WCC4N3EVYXPT
    ata-WDC_WD100EMAZ-00WJTA0_1EG9UBBN
    ata-WDC_WD30EFRX-68EUZN0_WD-WCC4N6ARC4SV
    ata-WDC_WD30EFRX-68EUZN0_WD-WCC4N6ARCZ43
    ata-WDC_WD30EFRX-68N32N0_WD-WCC7K2KU0FUR
    ata-WDC_WD30EFRX-68N32N0_WD-WCC7K7FD8T6K
special
  mirror-2
    ata-CT500MX500SSD1_1904E1E57733-part2
    ata-CT500MX500SSD1_2005E286AD8B-part2
logs
  mirror-1
    ata-CT500MX500SSD1_1904E1E57733-part1
    ata-CT500MX500SSD1_2005E286AD8B-part1
-------------------------------------------- 

kif

  • Intel i3 4170
  • 8GB RAM
  • 2x256GB Inland SSD
pool
-------------------------------
inland
  mirror-0
    ata-SATA_SSD_22082224000061
    ata-SATA_SSD_22082224000174
-------------------------------

Notes

These machines are a bit different in terms of storage layout. Morbo/Planex both actually store decent amounts of data, and kif is there just to help validate things, so it doesn't get a lot of anything. We'll see why later. Would having Morbo/Planex both have identical disk layouts increase performance? Yes, but so would SSD's, for all of the data. Tradeoffs.

ZFS setup

I decided to make my setup simpler on all of my systems, and just keep the mount points for glusterfs the same. On each system, I created a dataset named gluster and set it's mountpoint to /mnt/gluster. This makes it a ton easier to not remember which machine has data where, and keep things streamlined. It may look something like this.

zfs create pool/gluster
zfs set mountpoint=/mnt/gluster

If you have one disk, or just want everything on gluster, you could just mount the entire drive/pool to somewhere you'll remember, but I find it most simple to use datasets, and I have to migrate data from outside of gluster on the same array to inside of gluster. That's it for ZFS specific things.

Creating a gluster storage pool

gluster volume create media replica 2 arbiter 1 planex:/mnt/gluster/media morbo:/mnt/gluster/media kif:/mnt/gluster/media force

This may look like a blob of text that means nothing, so let's look at what it does.

# Tells gluster that we want to make a volume named "media"
gluster volume create media

# Replicat 2 arbiter 1 tells gluster to use the first 2 servers to store the
# full data in a mirror (replicate) and set the last as an arbiter. This acts
# as a tie breaker for the case that anything ever disagrees, and you
# need a source of truth. It costs VERY little data to store this.
replica 2 arbiter 1

# The server name, and the path that we are using to store data on them
planex:/mnt/gluster/media
morbo:/mnt/gluster/media
kif:/mnt/gluster/media

# Normally you want gluster to create it's own directory. When we use datasets,
# the folder will already exist. This is something you should understand can
# cause issues if you point it at the wrong place, so check first
force

If all goes well, you can start the volume with

gluster volume start media

You'll want to check the status once it's started, and it should look something like this.

Status of volume: media
Gluster process                             TCP Port  RDMA Port  Online  Pid
------------------------------------------------------------------------------
Brick planex:/mnt/gluster/media             57715     0          Y       1009102
Brick morbo:/mnt/gluster/media              57485     0          Y       1530585
Brick kif:/mnt/gluster/media                54466     0          Y       1015000
Self-heal Daemon on localhost               N/A       N/A        Y       1009134
Self-heal Daemon on kif                     N/A       N/A        Y       1015144
Self-heal Daemon on morbo                   N/A       N/A        Y       1854760

Task Status of Volume media
------------------------------------------------------------------------------

With that taken care of, you can now mount your Gluster volume on any machine that you need! Just follow the normal instructions for your platform to install Gluster as it will be different for all of them. On NixOS at the time of writing, I'm using this to manage my Glusterfs for my docker swarm for any machine hosting storage. https://git.kdb424.xyz/kdb424/nixFlake/src/commit/5a1c902d0233af2302f28ba30de4fec23ddaaac9/common/networking/gluster.nix

Using gluster volumes

Once a volume is started, you can mount it pointing at any machine that has data in the volume. In my case I can mount from planex/morbo/kif, and even if one goes down, the data is still served. You can treat this mount identically to if you were storing files locally, or over NFS/SSHFS, and any data stored on it will be replicated, and left high availability if a server needs to go down for maintenance or if it has issues. This provides a bit of a backup (in the same way that a RAID mirror does, never rely on online machines for a full backup), so this could not only let you have higher uptime on data, but if you have data replication on a schedule for a backup to a machine that's always on, this would do that in real time, which is a nice side effect.

Now what?

With my docker swarm being able to be served without interruption from odd quirks, and it replacing my need to ZFS send/recv backups (on live machines, please have a cold store backup in a fire box if you care about your data, along with an off site backup), this lets me continue to forget that computers exist so I can focus on things I want to work on, like eventually setting up email alerts for ZFS scrubs, or S.M.A.R.T. scans with any drive warnings, I can continue to mostly forget about the details, and stay focused on the problems that are fun to solve. Yes, I could host my data elsewhere, but even ignoring the insane cost that I won't pay, I get to actually own my data, and not have a company creeping on things. Just because I have nothing to hide doesn't mean I leave my door unlocked.

Obligatory "things I say I won't do, but probably will later"

  • Dual network paths. Network switch or cable can knock machines offline.
  • Dual routers! Router upgrades always take too long. 5 minutes offline isn't acceptable these days!
  • Discover the true power of TempleOS.

Maybe flakes...

So I think I know how to flakes! Sort of...

After much pain over a week of learning, and a lot of failing, I've started to understand some of why people use flakes. I don't believe that this is something that any sane person should learn, but that applies to most of Nix. Having nix around should be like having docker around for many people. You don't know how it works, but you can use a docker compose file and just do light edits to have most of the gain for knowing nearly nothing. With that said, if you are dumb enough to fall down the rabbit hole like I was, here's what I learned about flakes. First some highlights of what they even are.

  • Nix channels become inputs. No need to manage these anymore if that bothers you.
  • Thanks to version locking, it's great for keeping systems in sync with each other.
  • Solves what I was doing with linking home manager configs "for free"

So far, I've been managing NixOS on 2 computers, home-manager is managed on many machines, but with 3 definitions. This lead me to deciding to pull all of my configs into one flake. While I don't let NixOS or Nix-Darwin manage the home-manager bits themselves, I can put it all in a single flake to keep it all in one place. If you want to see the entire flake as it was at the time of posting there ya go, but I'm going to only pull out snippits to talk about.

So that's all it does? Why bother now?

Pretty much, yes. I managed to break my Gentoo install on my M1 Mac mini server completely by my own stupidity and not knowing how the hardware worked while compiling the kernel, and decided to just give NixOS a toy with on it instead. I was already on NixOS on my rarely used laptop, and quickly noticed that a lot of my configs were the same, so I started to integrate them into reusable parts, much like I did in home-manager. I got about half way through combining them when I realized that I would need to run git as root as the directories were root owned, and decided that maybe I should stop doing things my way, and learn the right way.

Where is the best place to start?

At the inputs of course! These are the things that I pull software from. They are software repos with their own flakes that I can grab and use as I need.

  inputs = {
    # Nixpkgs
    nixpkgs.url = "github:nixos/nixpkgs/nixos-unstable";

    # Home manager
    home-manager.url = "github:nix-community/home-manager";
    home-manager.inputs.nixpkgs.follows = "nixpkgs";

    darwin = {
      url = "github:lnl7/nix-darwin";
      inputs.nixpkgs.follows = "nixpkgs";
    };

    apple-silicon.url = "github:tpwrules/nixos-apple-silicon";
    
    hyprland.url = "github:hyprwm/Hyprland";
    
    emacs = {
      url = "github:nix-community/emacs-overlay";
      inputs.nixpkgs.follows = "nixpkgs";
    };
  };

Because I ran an M1 mac in the setup, I already had to take the apple silicone remote, so I looked around for others. I'm using hyprland on my laptop as something different, and even grabbed the emacs overlay to get some more optimized versions as I use Doom Emacs for most of my code editing.

Voodoo magic

The code below is code I took from another repo. It handles making systems in a format that's clean and easy to read, and handles the voodoo for me. Unless I end up needing a system not defined in the forAllSystems section, I can simply not touch this and let it do it's magic.

  outputs = {
    self,
    nixpkgs,
    home-manager,
    ...
  } @ inputs: let
    inherit (self) outputs;
    forAllSystems = nixpkgs.lib.genAttrs [
      "aarch64-linux"
      "i686-linux"
      "x86_64-linux"
      "aarch64-darwin"
      "x86_64-darwin"
    ];

    mkNixos = modules:
      nixpkgs.lib.nixosSystem {
        inherit modules;
        specialArgs = {inherit inputs outputs;};
      };

    mkDarwin = system: modules:
      inputs.darwin.lib.darwinSystem {
        inherit modules system inputs;
        specialArgs = {inherit inputs outputs;};
      };

    mkHome = modules: pkgs:
      home-manager.lib.homeManagerConfiguration {
        inherit modules pkgs;
        extraSpecialArgs = {inherit inputs outputs;};
      };


Bonus, it even includes a devshell to pull in deps to build everything initially.

    # Devshell for bootstrapping
    # Acessible through 'nix develop' or 'nix-shell' (legacy)
    devShells = forAllSystems (
      system: let
        pkgs = nixpkgs.legacyPackages.${system};
      in
        import ./shell.nix {inherit pkgs;}
    );

The important bits. System management!

Thankfully, once we get to this point, the voodoo above makes it a lot easier. You just define systems, and point them to a nix file and do the normal, not flake stuff mostly from there. My NixOS/Nix-Darwin machines get their name and files pointed, then home manager needs a username as well, as it's for, well, me the user, and not the system.

    nixosConfigurations = {
      # M1 mac mini
      farnsworth = mkNixos [./hosts/farnsworth];

      # Laptop
      amy = mkNixos [./hosts/amy];
    };

    darwinConfigurations = {
      # M2 Mac mini
      cubert = mkDarwin "aarch64-darwin" [./hosts/cubert];
    };
    homeConfigurations = {
      "kdb424@amy" = mkHome [./home-manager/machines/amy.nix] nixpkgs.legacyPackages.x86_64-linux;
      "kdb424@cubert" = mkHome [./home-manager/machines/cubert.nix] nixpkgs.legacyPackages.aarch64-darwin;
      "kdb424@farnsworth" = mkHome [./home-manager/machines/headless.nix] nixpkgs.legacyPackages.aarch64-linux;
      "kdb424@planex" = mkHome [./home-manager/machines/headless.nix] nixpkgs.legacyPackages.x86_64-linux;
      "kdb424@zapp" = mkHome [./home-manager/machines/headless.nix] nixpkgs.legacyPackages.x86_64-linux;
    };

With all of that defined, it basically just automates detection of the system and user, and will build things for me. I yoinked and modified a justfile from someone to make it even easier, so I can run just switch or just hm-switch to easily update the respective system and home manager stuff. It was a lot of learning, and a lot of yoinking, but it's starting to manage much of itself. Finally...

What's the point?

I've already started porting more and more out of homebrew on the Mac, and starting to feed my configs into it as I still have a full backup in git with yadm. Things like yabai and skhd have been pretty easy to migrate once I got my head wrapped around it. Getting things out of homebrew is quite nice, as homebrew, while it usually works, has not been an amazing tool for me to use, and breaks more than I would like. I've also gotten tired of managing my hosts file on my systems as I don't have, or want, a DNS resolver inside of my Zerotier network, so being able to update that in one place and all systems get it has been great. As I was writing this, I was fixing issues on my VPS that could have been much faster with Nix to resolve as I'm more familiar with Nix at this point than Nginx. There's still things I could do, but Nix will have to be something that I understand to the same level or greater than what I already know. For now, I'll stick to just using docker in nix to manage my services as I can't see a ton of reason on why that can't continue to work and be relatively invisible to me. Nix can at least automate making my compose files easy to access over NFS.

My first nix flake!

It's happened, I've drank the punch.

So I got into dev shells a while back, but I've started to run into some issues, mostly with other's nix shell environments. QMK's shell.nix is one such issue, and I believe it has something to do with it being written for NixOS, or at least Nix on Linux. This highlights one of the biggest weaknesses of using "bare" nix as opposed to Nix Flakes, with their ability to build different targets. With that out of the way on the why I bothered, here's my first flake!

This blog!

{
  description = "A flake for developing and building my personal website";

  # It's a flake, may as well try the latest
  inputs.nixpkgs.url = "github:nixos/nixpkgs/nixpkgs-unstable";

  # Useful utilities to automatically create targets for different
  # platforms. Just makes it more readable in this case.
  inputs.flake-utils.url = "github:numtide/flake-utils";

  # This builds a package, in this case, containing zola
  
  outputs = { self, nixpkgs, flake-utils }:
    flake-utils.lib.eachDefaultSystem (system:
      let
        pkgs = nixpkgs.legacyPackages.${system};
      in
      {
        # This uses nix to fully build the site as a nix package.
        packages.website = pkgs.stdenv.mkDerivation rec {
          pname = "static-website";
          version = "2023-08-26";
          src = ./.;
          nativeBuildInputs = [ pkgs.zola ];
          buildPhase = "zola build";
          installPhase = "cp -r public $out";
        };
        # This output is what we use for our dev shell.
        defaultPackage = self.packages.${system}.website;
        devShell = pkgs.mkShell {
          packages = with pkgs; [
            gnumake
            zola
          ];
        };
      }
    );
}

While functionally similar to the previous system without a flake, it will create a flake.lock file. Currently it looks like this, though you should never hand edit this file, I'm just showing what's in it.

{
  "nodes": {
    "flake-utils": {
      "inputs": {
        "systems": "systems"
      },
      "locked": {
        "lastModified": 1692799911,
        "narHash": "sha256-3eihraek4qL744EvQXsK1Ha6C3CR7nnT8X2qWap4RNk=",
        "owner": "numtide",
        "repo": "flake-utils",
        "rev": "f9e7cf818399d17d347f847525c5a5a8032e4e44",
        "type": "github"
      },
      "original": {
        "owner": "numtide",
        "repo": "flake-utils",
        "type": "github"
      }
    },
    "nixpkgs": {
      "locked": {
        "lastModified": 1693355128,
        "narHash": "sha256-+ZoAny3ZxLcfMaUoLVgL9Ywb/57wP+EtsdNGuXUJrwg=",
        "owner": "nixos",
        "repo": "nixpkgs",
        "rev": "a63a64b593dcf2fe05f7c5d666eb395950f36bc9",
        "type": "github"
      },
      "original": {
        "owner": "nixos",
        "ref": "nixpkgs-unstable",
        "repo": "nixpkgs",
        "type": "github"
      }
    },
    "root": {
      "inputs": {
        "flake-utils": "flake-utils",
        "nixpkgs": "nixpkgs"
      }
    },
    "systems": {
      "locked": {
        "lastModified": 1681028828,
        "narHash": "sha256-Vy1rq5AaRuLzOxct8nz4T6wlgyUR7zLU309k9mBC768=",
        "owner": "nix-systems",
        "repo": "default",
        "rev": "da67096a3b9bf56a91d16901293e51ba5b49a27e",
        "type": "github"
      },
      "original": {
        "owner": "nix-systems",
        "repo": "default",
        "type": "github"
      }
    }
  },
  "root": "root",
  "version": 7
}

This will fully lock down all of the sources by revision of git commit, or similar. This insures that if Zola updates, and it breaks the blog, no new install of Zola on a new machine, or a newly spawned shell will seemingly randomly break. This gives us the option of updating only when we are ready, knowing that all machines are on identical versions of the software, and we can update and push the exact same update to all machines at the same time. Updating the flake is as simple as running nix flake update. If everything works as expected, then commit the new flake.lock file to the repository and push it like any other change to the repo.

Other upsides

Now that I have a flake, I can simply reference it from other flakes, even if I don't have it locally installed on the machine. FlakeHub is a common place that people push their flakes for others to use, as is GitHub. Flakes can be layered similar to docker images, so you can use other's flakes to build on top of to make creating tooling easier, as well as deployment of build tools! Nix can, and will, eat your everything if you let it.

Further rambling outro

While I have stated that I won't let Nix eat my everything, I'm coming around to the cool tooling that it has to offer. I doubt that I'll let it completely take over everything, but time will tell. I've still not got amazing things to say about NixOS, and quite like having a system underneath nix to run the show, but I try to give things a try before truly dismissing them. Maybe next I'll try to build docker images with nix as I'm not a huge fan of creating images the "normal" way. Still keeping docker, but changing the build tooling. We'll see I suppose.

Useful snippits that may help you out.

Make a shell package, or basic flake to start a dev environment, all in a zsh/bash function.

nixify() {
  if [ ! -e ./.envrc ]; then
    echo "use nix" > .envrc
    direnv allow
  fi
  if [[ ! -e shell.nix ]] && [[ ! -e default.nix ]]; then
    cat > default.nix <<'EOF'
with import <nixpkgs> {};
mkShell {
  nativeBuildInputs = [
    bashInteractive
  ];
}
EOF
    ${EDITOR:-vim} default.nix
  fi
}
flakify() {
  if [ ! -e flake.nix ]; then
    nix flake new -t github:nix-community/nix-direnv .
  elif [ ! -e .envrc ]; then
    echo "use flake" > .envrc
    direnv allow
  fi
  ${EDITOR:-vim} flake.nix
}

And some more reading if you want to know more. These are the resources that I used to get where I am with this post.

https://ejpcmac.net/blog/migrating-to-a-static-blog/
https://fasterthanli.me/series/building-a-rust-service-with-nix/part-10
https://zero-to-nix.com/concepts/flakes